Have you ever visited a website and seen an ad for something you were practically thinking about? It’s unsettling, isn’t it? Although the Internet is not reading your mind, whoever set up that ad, has probably used a tracking pixel.
In digital marketing, it’s therefore not uncommon to hear the terms “marketing pixels” or “tracking pixels”, however often without explanation. As normal users, most people are confronted with them each time they accept or decline the cookies on a website.
In this article, we’re covering all you need to know about these powerful marketing tools.
How does a tracking pixel look like?
Tracking pixels are snippets of programming code used to monitor user behavior, web traffic, site conversions, and other metrics. Today such marketing pixels are no longer actual pixels, nor tiny images embedded on a website, but that’s exactly where their name originated from back in the early days of Facebook and Google.
Today these pieces of code (most often Javascript and HTML Code) look like this:
![]()
The exact form of the code depends on the advertising platform you choose and may change over time.
Marketing pixels are immensely useful to advertisers because they are highly effective at recording valuable data for web analytics. With a tracking pixel, you can monitor email responses, sales conversions, checkouts, website visits as well as other forms of web events and activities.
How do tracking pixels work?
Whenever someone visits your website, the pixel tracking code is processed by the visitor’s browser. The pixel then records data specific to the visitor, like their operating system or their following actions on the website, and then sends all this data to the pixel provider’s servers (eg. Facebook, Google, Pinterest, LinkedIn, etc.). As this happens in the background, most users remain oblivious, while their data tracking can help to create more customized content and digital advertising experiences for them.
![]()
To summarize, tracking pixels can record data and make it available in the pixel’s owner’s advertising accounts on the platforms that provide the pixel code. Here are some examples of trackable data:
- operating system type
- the time and date when a particular web page was visited
- the type of client used, i.e. whether it was a dedicated email program or a browser
- IP addresses
- user activities on the website during a session, like checkout, “Add to cart”, sign-ups or other relevant events
- the clients’ screen resolutions
The data obtained from tracking pixels is beneficial for search engine optimization (SEO) specialists, website administrators, and most importantly digital marketers because it enables them to optimize their offers and adapt them to different device types and user interests.
![]()
In order for pixels to actually track any behavior, EU law and GDPR regulations require an active cookie consent from the website visitor.
Therefore (almost) every time you accept or deny external cookies on a website, you’re actually reacting to the use of tracking pixels. If you take the time to actually read what information is tracked by various websites, you can see which pixels and providers are involved. A great (and creepy) example is this page from TechCrunch/Yahoo.
How to install and use tracking pixels?
There are a great variety of tracking pixel platforms available but none beats the scope and effectiveness of the Google Tag Manager and the Facebook pixel.
The Facebook tracking pixel
The Facebook pixel is a code snippet that, when installed on your website, lets you monitor conversions from Facebook advertisements, optimize ads, create targeted audiences for future adverts and retarget individuals who have previously visited your website. You can also use the tracking pixel to monitor visitor behavior on your website. In a nutshell, the Facebook Pixel helps you determine an effective advertising strategy, identify a highly relevant audience, and optimize your funnels.
If you’re wondering how Facebook is able to retarget someone who visited your website: the pixel installs tracking cookies in the visitor’s browser, which helps Facebook to recognize users across the web.
Each Facebook ad account gets a default pixel to use. It’s composed of two parts: the event code and the pixel base code.
The pixel base code tracks all traffic to your website, while event codes are added beneath the default pixel code on particular website pages to track specific actions.
Facebook event codes
Search: If you run an eCommerce store, you can add the search event code on a search results page.
View content: You can put the view content event code on a product page, for example, to monitor the views of a particular inventory.
Add to cart: If your visitors put items into their shopping cart but don’t finish the purchases, you can use the pixel data from this code to launch a highly targeted campaign for just those individuals.
Add to wishlist: If you have a wishlist option on your website, you should place this event code on the page to monitor the items people want most. You can then target them with a Facebook ad that contains images of those particular products.
Initiate checkout: This event code is ideal for pages where someone starts a checkout process on your website.
Add payment information: The add payment event code fires when a customer adds payment information.
Custom: You can customize this particular event code to meet specific objectives. Remember, though, if you create a custom event, you’ll need to set a custom conversion for it as well.
With this many pixel event options, you can gather all the data you need to learn more about your audience and website visitors and to take data-based business decisions.
What if I don’t have a website?
Interestingly, you don’t need a website to use the Facebook pixel. You can install the pixel through several third-party services. Below are a few examples:
Leadpages is a landing page website builder that enables you to create highly-targeted pages for people to visit. You can create pages within the lead pages platform and share them through Facebook advertisements, pages, groups, and even other social media platforms.
Teachable, an e-learning website, allows you to put the Facebook pixel on its website to track your classes’ views and purchases. Fact: We used Teachable to build the very first neonacademy prototype 🙂
How to create and install the Facebook pixel
Step #1: Install the pixel’s base code
The Facebook Pixels can be found in the “Events Manager” menu in the Facebook Ads Manager.
- To set up the Facebook pixel, go to one of your Facebook ads manager accounts, click the top left menu button, and choose “Events Manager” from the asset’s column (These “events” have nothing to do with physical events or Facebook Events).
- Now click the green plus on the left bar to “Connect a new data source”.
- Choose “Web” and then “Facebook Pixel” and add a name and your website URL.
Now, you need to decide how you’ll install your pixel code. You can use a tag manager plugin to install the pixel if you have a third-party website that permits this integration level.
If you chose to copy and paste the code, you’ll see the install pixel base code page. Select the code box to copy the code to your clipboard. Once this is done, all that’s left is to paste it into your website’s head tags. If you’re unsure how to do that, contact your web administrator to help you out. If you don’t trust yourself to set it up the right way, there’s an option to email the code to a trusted friend or web developer.
There is also an advanced matching option that lets you gather more data from your website, like phone numbers and first names. It is an advanced feature typically used for e-commerce websites that requires more configuration and passes on more data to Facebook.
Test your pixel
The last thing you need to do is test your pixel’s status. You can for example use the Facebook Pixel Helper plugin to determine if a Website has a working pixel or you can use the “Test Events” tab directly in the pixel setup menu and enter your URL there.

Google Tag Manager
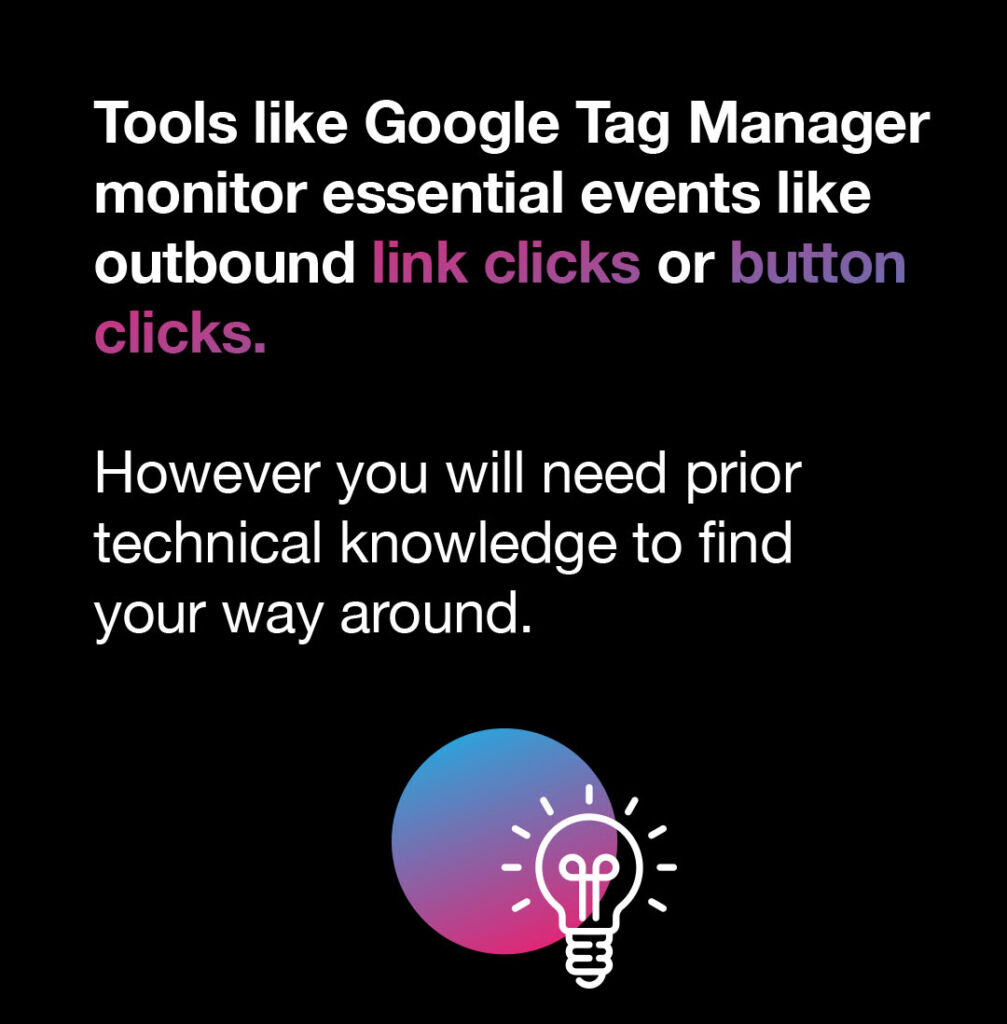
Google Tag Manager (GTM) is a free tool that lets you deploy and manage tracking pixels, event tags, and much more without needing to edit your website or apps code. It thus helps marketers to work more efficiently, because there’s no need to wait for developers.
Note: Although Google says the Tag Manager is a straightforward tool to use, there’s a lot of possibilities that are not as simple to implement. In general, however, creating basic tags, variables, and triggers shouldn’t be too complicated if you have the right tutorial at hand (read on 😉 ).
Benefits of Google Tag Manager
Once you’ve gone acquainted with Google Tag Manager, it’s pretty cool what you can do. You can basically create and monitor any type of events on your website. Think events like outbound link clicks, PDF downloads, almost any button clicks, and complex e-commerce product and promotion tracking.
Other benefits include:
- Google Tag Manager has a debug and preview mode which is incredibly helpful to make sure everything works as expected
- Compatibility with non-Google products
- It gives you the flexibility to experiment and test a lot
- All tracking code is in one place
- It may improve load speed depending on the number of tags you use
- It also shows you all the active tags on a site
How to use Google Tag Manager
Step #0: Understand the basics
Before getting started it might be useful to understand the following points:
- what are tags, events, triggers, variables?
- how does Google Analytics work in combination with Google Tag Manager?
- how to create goals in Google Analytics and understand actions, labels, and categories
So, there are three fundamental parts to the Google Tag Manager:
Tags
A tag can be seen as an event that happens on your website. They are tiny bits of code that record what happened. And while there are plenty of 3rd party integrations, you can also choose to add custom code.
Some examples of 3rd party pixels would be:
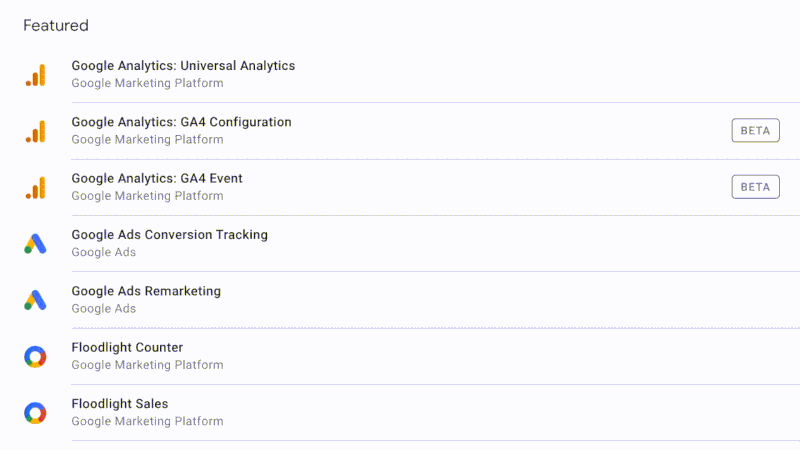
- Google Analytics universal tracking code
- GoogleAds conversion tracking code
- Heatmap tracking codes like Crazyegg or Hotjar
- Social network pixels like the Facebook pixel or Pinterest Tag
Triggers
Triggers activate the tags you set up. They tell your Tag Manager, when an event happens and which tag to activate.
An example would be: Every time a page is loaded, activate the Facebook Pixel tag.
Here we have the “when” (every page load) and the “which tag” (Facebook Pixel).
Variables
Variables provide supplementary information that Tag Manager may need to trigger a tag and ensure it is fully operational.
Google Analytics
In Google Analytics you can set Goals, which usually represent the conversions you want to achieve. If these goals can’t be defined by a simple URL, like visiting a /thank-you page after a newsletter subscription, to define them by creating tags in Google Tag Manager that can be imported as events in Google Analytics.
Categories, Actions, Labels
A Google Analytics event can be defined by its category, action, and value. These labels are necessary to import events/tags from Google Tag Manager to create Goals in Google Analytics.
Step #1: Set up your Google Tag Manager
- The first thing you need to do is to create an account if you don’t have one already.
- Next, choose your country and click continue. GTM will ask you to create a container (a centralized tag management interface).
- After you click create and consent to the terms of service, you’ll see your container id. You’ll need to add the two code snippets to every page on your site to finish the setup process.
Note 1: In most scenarios, you should use a single container for all the tags on your website. However, it can hold tags and triggers for a mobile app or accelerated mobile pages (amps).
Note 2: It’s important that you follow the on-screen prompts if you aren’t familiar with website code.
Step #2: Add tracking pixels
Now if you already have tracking pixels installed on your website, skip to the next step.
If not you first need to add tags that incorporate tracking pixels from either social media platforms or other providers. For instance, if you want Facebook to monitor your site, you can add their Pixel by using a “custom HTML tag” which contains the Facebook Pixel code and triggers on every page (step by step guide below!).
Note: if you already have marketing pixels on your website, it will be a lot more convenient for you to move them all to the google tag manager.
- To make a new tag, select the tags option in the left sidebar, then click “new.”
- Give the Tag a name in the top right, and click on the big box label “tag configuration”.
- On the next screen, you’ll see all the available tag types, including Google-related tags, custom tags, and third-party tags in the “more” section. You’ll find in-built options for social media marketing tools like Twitter and Hotjar.
- If you don’t see a pre-built option for platforms like Facebook, you may use the “custom HTML” option.
How to add Google Analytics via Google Tag Manager
Depending on which Google Analytics version you’re using, you’ll have to do different things.
For the old version (before Google Analytics 4):
- Create a new tag and call it Google Analytics – All Page Views
- Choose “Google Analytics: Universal Analytics” as the tag type
- Configure the track type as Page view, check the “override settings in this tag” and click on the lego icon next to the Tracking-ID field.
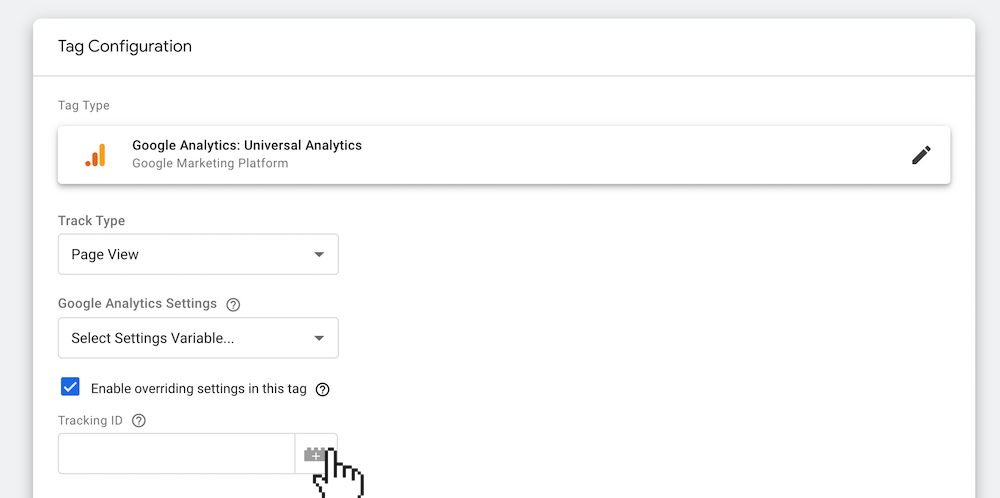
- In the variables menu, click on the + in the top right
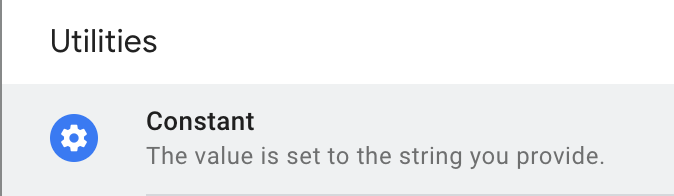
- Give the variable a name and choose “Constant” as the variable type.
- As the value, add your Google Analytics Tracking ID, which you can find in Google Analytics > Admin > Property > Tracking info > Tracking code.
- Save the variable and make sure it’s chosen as Tracking ID in your tag.
- Below the tag configuration, you can choose a trigger for this tag.
- Click on the trigger box and choose the already configured “All Pages” trigger.
Save everything and you’re good to go, the Google Analytics will now track “page views” (what) on “All Pages” (when).
For the new version (Google Analytics 4):
- Create a new tag and call it Google Analytics – All Page Views
- Choose “Google Analytics: GA4 Configuaration” as the tag type
- Enter the Tracking-ID of your Google Analytics property, which you can find in Google Analytics > Admin > Property > Tracking
- Below the tag configuration, you can choose a trigger for this tag.
- Click on the trigger box and choose the already configured “All Pages” trigger.
Save everything and you’re good to go, the Google Analytics will now track “page views” (what) on “All Pages” (when).
How to add the Facebook pixel to Google Tag Manager
Note: This procedure also works for Twitter, Pinterest, LinkedIn, or similar tracking pixels.
- Create a new tag and call it Facebook Pixel
- Choose “custom HTML” as tag type
- Go to your business manager and copy the Facebook pixel, then paste it into the “custom HTML” tag
- In the Advanced settings, set the Tag firing options to “Once per Page”
- Below the tag configuration, you can choose a trigger for this tag.
- Click on the trigger box and choose the already configured “All Pages” trigger.
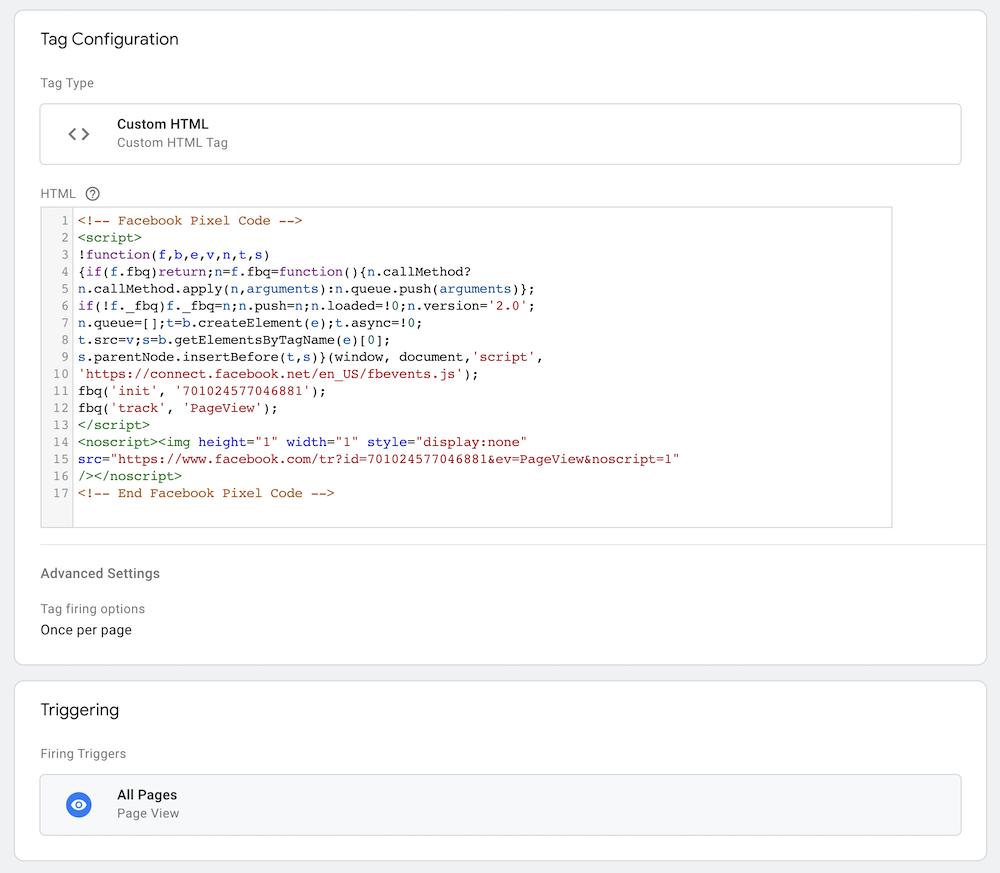
Save everything and you’re good to go, the Facebook Pixel (what) will now fire “Once per page” (when).
Note: It helps to give the tag a name that’s easy to remember, like “Facebook pixel,” so you know what it does.
Step #3: Create Events for Google Analytics
Let’s say we want to track a button click which ads a certain item to the user’s cart. For this, we have to create a custom event, that fires when this specific button is clicked.
- Create a new tag and call it “Add to cart”
- Choose “Google Analytics: Universal Analytics” as a tag type
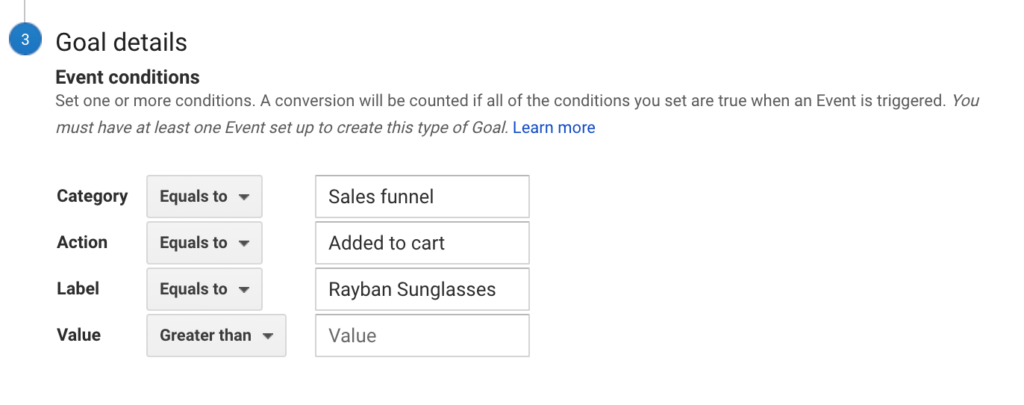
- Configure the track type as Event, then set the category, action, label, and value. Remember these are important for Goals in Google Analytics.
I’ll take the same example as above: Category > Sales Funnel ; Action > Added to cart ; > Label > Rayban Sunglasses - Check the “override settings in this tag” and click on the lego icon next to the Tracking-ID field and use the Analytics ID you previously set up.
- Below the tag configuration, you can choose a trigger for this tag.
Now we need to add a trigger to this tag:
- Click on the trigger box and click on the plus in the top right to create a new trigger.
- Give the new trigger a name and click on the configuration box.
- Choose “All elements” as trigger type and choose the “Some clicks” option
- Now you need to define for which clicks it should trigger. There are multiple options that can be combined in order to achieve what you need.
- The three main options are:
- Click URL: the URL that the button is linking to
- Click Text: the text that the button contains
- Page URL: the URL that the button is on (in case you have the same button on different pages but only want to track the button on one specific page)
- Configure them so it works for your case.
Save everything and you’re almost good to go. Now you simply need to create a new Goal in Google Analytics with the same Category, Action, and/or label (you do this under Admin > View > Goals > New Goal > … > Goal Type: Event > …)

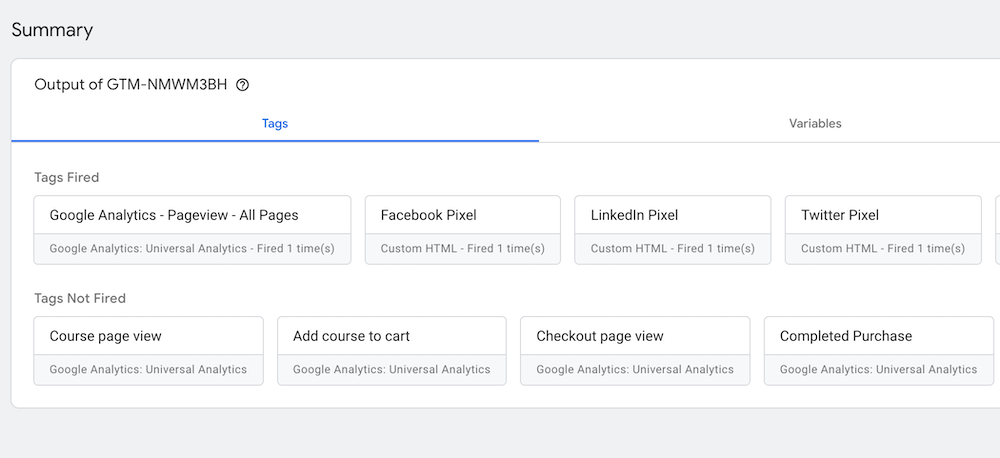
Step #4: Test and publish the tag
- To ensure tags are operational, click the preview button in the top right.
- A new tab will open and ask you to enter a URL. Enter your website’s URL and continue.
- Your website will open in another tab.
- Now you can navigate on your website while seeing your tags live in the “Tag Assistant” tab.
- You should now be able to observe which tags fire and which not, to control if everything works fine.
- On the left, you’ll see every action the browser “observes”, like “Window loaded” or “Click”. Clicking on them will show you the tag that triggered these specific events.
Examples:
- Tags like the before mentioned Facebook Pixel should fire on every new page load.
- Tags like the “Added to cart” that we created before should only fire when the specific button is clicked.
Pro Tip:
To better understand why a tag was fired or not, you can click on the event on the left side that should have fired the tag, and then click the tag that should have fired. A box will open from the right, showing you which trigger fired and which not.
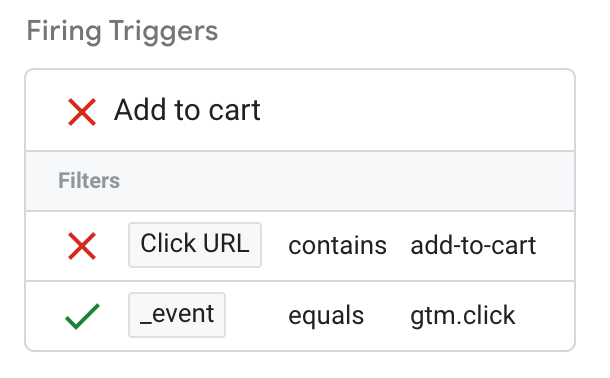
Example: This added to cart tag didn’t fire because the click URL did not contain “add-to-cart”.
Marketing pixel best practices
While tracking pixels can be a great asset to your digital marketing efforts, not all users will share your point of view. For this reason, there are a few best practices you’ll want to implement
Be precise
You don’t need tracking pixels for every user on every webpage. Instead of casting a wide net with your data, you should refine your focus. This will improve the accuracy of the data you collect and give users an enjoyable experience.
Pixel placement
Never (or almost never) incorporate anything into your site that you know will slow it down. You don’t want your tracking pixels to activate before the page has fully loaded. Your content should be the priority. Since users can’t see a tracking pixel, it should be the last component to load on a webpage.
Compatibility
If you add an HTTP tracking pixel to an HTTPS website, most browsers will display a security warning that scares visitors away. Ensure the code matches the website type.

Conclusion
Tracking pixels are an undeniably vital part of modern digital marketing. If you’d like to boost your online advertising performance, they’ll definitely give you the advantage you need. Even if you don’t intend to advertise right away, tracking pixels will help you understand how people engage with your website’s content. These benefits prove they are a worthwhile investment for your brand.